Sunday 29 November 2015

Weekly Challenge


Morning everyone,

Hope you are all enjoying the weekend.
It's the last one of November, if 
you hadn't already realised ha ha!!
December next week which not only
means Christmas but also the last 
month of The Calendar Challenge.  So don't 
forget to get your entry in if you haven't 
already done so! 

Well it's time to announce our new
Weekly Challenge.
I think as we have been looking at
paper folding, it has got to be 
something to do with that!
Sooo, I'm going to be really strict 
this week, no 'loosely' to be used
this time ha ha!!
Your mission, should you choose to 
accept it, is for a project with 
something folded either on it or 
forming the project.  So either the 
actual card is folded into a shape or
has a folded shape on it.  But it doesn't
have to necessarily be a card.

Is that ok??


So, you know the rules by now, as many
entries as you like, via the link if
possible.  If not then send your pics to
janecraftbarn@gmail.com
The link will close at midnight Sunday 
6th December.
The winner will be picked by Random
Generator and will receive a £10
gift voucher.

Happy Paper Folding, can't wait to see 
what you make!!

I'll be back on Tuesday with the next 
instalment of The Calendar Challenge
so the Weekly challenge Winner will be 
announced on Wednesday!

See you soon,

Jane x


Saturday 28 November 2015

Paper Folding


Happy Weekend,

It's Saturday again, gosh these days 
are really flying.  Only a month to
Christmas now!
Where has this year gone?

Unfortunately due to a last minute technical
hitch, I am unable to bring you the scheduled post 
for today.

Huge apologies!

All being well, I shall be back tomorrow
with our new challenge, so hope
to see you then!

Jane X


Friday 27 November 2015

Paper Folding - Rachel Snook


Morning all,


Welcome to day two of our paper folding 

week.  I do love papers and have to feel
them and sniff them!! Ha ha bet I'm not
the only one?? Come on ....you know you do too.

Today Rachel is here with us to show how she 

has made two lovely tree decorations.
Christmas is only a month away now.....
note to self - Christmas Cards need making!!


Cut two 4" squares of patterned paper.


Fold into quarters.  Along the fold lines,

cut in about 1" on each fold line.


Fold the corners using the cut folds to make

a cone shape and glue the edges together.


Repeat on all four corners.

Do the same with the other piece.
this forms your star shape!


Punch two circles of matching paper (I
used the blue scalloped circle Woodware punch).
Take some ribbon, folding it in half and
secure with double sided tape between the
two circles.  Leave enough ribbon above the
circles so you can hang the star.
Glue the circle to the back of one of
the stars, this covers the hole!
Stick the other star to the other side of the
circle, off setting the points.
You can now leave it as it is or
decorate if required.
I added a small die cut Poinsettia
to mine using red glitter card.
Hang  and enjoy!!


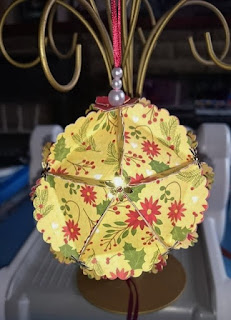
And for Rachel's second project -


Punch out twenty 2" scalloped circles.


Make a triangle template by measuring between
 the scallops you will have two eight and one nine
 scallops so the ninth scallop is folded an half.


As you can see this is a small template that
 helps for folding and add a T at the top.
 You just the need to raise the sides to form the triangle.


You need to do this for all twenty circles.
 Divide the circles in two sets of five and one of ten.

This forms the bauble.


Glue together, start with the five, you need 
to match the scallops up so that they align. 
As you can see from the photo you do not 
stack the fives to form the circle until the ribbon
 is put through.
The ten are glued together into a line.


Take half a metre of matching ribbon and fold
 in half. You will either use a piece of thin 
wire or needle threader to thread through the
 beads, you may find it easier to tread one end at a time.


Punch out a small flower or die cut if easier
 one in the cardstock used and one in Mirri card.
 Make a small hole in each and thread on the
 ribbon below the beads a little glue may
 be required to hold the flowers.


Take the ribbon and place on the first set of 
five and then glue together.


This is the top of the bauble. Then take the
 row of ten and as before matching the scallops
 this makes the centre of the bauble.  It may 
help to line them up and hold with paperclips
 until you are sure you have the correct fit.
 When happy you can start to glue. 
 Then attach the bottom five ensuring that the
 ribbon hangs through.


When you have your bauble glued, you need to
 repeat with the flowers and beads to finish.


Punch out or die cut Mirri card little flowers and glue

 one to each corner. Add a holographic 
peel off dot or self adhesive dot to match.


What a gorgeous bauble to make for 
your Christmas Tree.

Do you fancy trying these out?

This is what you will need ....

Poinsettia Die or embellishment of choice.
Woodware Blue 2"Scalloped Circle Punch
Flower Punch


I'll see you tomorrow with
another project!

Jane x

Thursday 26 November 2015

Paper Folding - Neil Walker


Hi everyone,

Did you know we have just had World
Origami Day on the 11th of November??
No......nor did I!
Well we thought it would be a good idea 
to get the DT paper folding and so
this week we shall see what they have been up to!

Today, we start with Neil.

Neil says.....


Hi 
At this time of the year I think there's often
 a need for quick and simple gift and
 presentation ideas. I like this simple gift 
bag as it is quick and easy to make and
 you can pretty much tailor the size
 to suit the gift.
You don't even need to add the handles;
 you could just fold the top over and hold
 it closed with a mini peg or clip too.


I've started off with an approximately A5 piece
 of old sheet music paper which had been
 embellished with a resist technique using a mask.

Place the paper decorated side down and fold 
the top edge over (measurements are fluid 
lol, this is about 1cm). Mark off the centre.


Fold the sides over to meet in the middle.


Use decorative tape to join together.


Open the bottom edge and push the folded 

outer edge in to flatten as seen.


Fold the bottom edge over. (This is around 2.5 cm ish)


Repeat for the other side.


Fold the edge to the middle..


Repeat for the other edge and join with
 decorative tape.


Punch a couple of holes in the top and add
 decorative string to create handles.


Finish with a suitable embellishment
 and your gift bag is ready.


How lovely is that?
I'd love to receive that bag, even if
there is nothing in it!

If you fancy having a go, this is what
Neil used....

White paper or old book paper

Tuesday 24 November 2015

Weekly Challenge Winner


Hello, hello, hello....

How are we all??

Before I forget, it is almost the 
 end of November and if you haven't
 finished your entry for November's 
Calendar Challenge, you haven't got 
much longer.....about a week me
thinks!

Well last weeks Challenge was all
to do with World Records, after visiting 
your blogs I think there were definitely
a few I hadn't heard of before.  Some of them
did make me laugh though!

So who has Mr Random Generator picked for 
us this time......


.........no 4........


Jane's Journal


Congratulations Jane on being our winner,
please contact me at
janecraftbarn@gmail.com
so that I can send you your prize.
I did like your World Record you created when 
making this card....
 "the number of different brand Christmas die cuts
 used on a single Christmas card"

Hahaha!!

Ok well that's it for today,

see you soon,

Jane x

Sunday 22 November 2015

Weekly Challenge


Hellooo,

So, did you get any of the white stuff
yesterday??
We woke up to a white slushy ground,
didn't last though but gosh it has
certainly turned colder. We have 
actually put the central heating on for the first 
time.  can't say I feel the cold,
too many hot flushes haha!!  I have my very
own central heating system, trouble is
it doesn't always know when to turn itself off!

Well it's Sunday again and time to
announce our new challenge for the 
week......I'm struggling here folks!

I think as we saw our first snow/slush
yesterday of the winter, I am going to say

 Snowflakes 

It can be stamps, die cuts, stencils, masks
whatever you fancy.  So that gives you 
something to think about!!

Who will be first to post today I wonder?

You know the rules, entry via link where 
possible or to me at
janecraftbarn@gmail.com
The link will close at midnight on
Sunday 29th November.
As many entries as you like and the 
winner will be announced on
Tuesday 1st December.  As usual a £10
gift voucher is up for grabs.

So off you go and look for those snowflakes!

Good luck everyone!

Jane x


Saturday 21 November 2015

Anything Goes - Neil Walker


Hellooooo,

Happy weekend everyone,
I wonder how many of us will get snow
today, let us know if you see any
of the white stuff!

Today, for our last look back. here
is Neil and his fabulous night and day 
accordion book.

Neil says -
I love how the same design can look so different just by changing your colours.


I've made a simple accordion book; one side for day and the
 other for night.


Begin by stamping and heat embossing your image onto a light
 and a dark base with black embossing powder. Glue onto Tando Creative Media Boards and trim the edges.


For my day image I've coloured with bright and cheerful tones
 using Distress Markers and a blending brush filled with water.


For my Night image, which was embossed onto a black paint
 spattered card, I have used DecoArt Interference paints
 to add a subtle colour and shimmer.


Construct an accordion for the inside and glue to the covers.


Paint the night side of the pages with Prussian Blue and the day
 pages with a pale wash of the same.

Another lovely Christmas gift??

If you would like to have a go, this is what
Neil used.....

see you then!
Jane x